Bake Rustic Fruit Tart
08/23/2021
Opportunities for families to experience life’s simplest pleasures abound during summer’s final days. They take minimal planning and yield happy rewards.
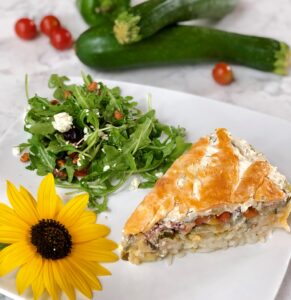
We enjoy impromptu evening bike rides, or a jaunt in the country to pick berries. On the return home, I choose juicy nectarines, peaches and plums at a roadside stand – a perfect combination with berries for preparing a delicious rustic fruit tart. Also called a galette, it’s free-form and goes together easily, and the best part is that kids can get actively involved. Tell them they can be the “King and Queen of Tarts” as you show them how to stir, knead and roll out the pliable dough. Actually, it’s perfect play for “royalty” of all ages.
For a large family-style “Rustic Fruit Tart” to serve 6-8, you’ll need:
DOUGH
1 1/2 cups unbleached all-purpose flour plus 3-4 tablespoons for rolling out dough
1/2 teaspoon salt
10 tablespoons unsalted, cold butter cut into 1/2-inch chunks
3-4 tablespoons ice water
FILLING
1 cup berries (I like a combination of blueberries and raspberries or blackberries)
2 1/2 cups of peeled and thinly sliced fruit such as nectarines, peaches and plums
4-5 tablespoons sugar and 1 tablespoon for sprinkling
1 tablespoon flour
1 tablespoon lemon juice and 1 teaspoon grated lemon zest (optional)
pinch of salt
Here’s the fun:
For dough, place flour and salt in a mixing bowl and let kids stir together with clean fingers. Scatter butter chunks into flour mixture, and toss and rub between fingertips until butter is the size of peas. Use a pastry blender, iyou prefer. Drizzle ice water over mixture and work it with hands until all the flour is moistened and the dough comes together. Knead a few times on a flour-covered surface, shape into a disk and wrap in plastic wrap. Refrigerate for 15-30 minutes.
Preheat oven to 400 degrees. Remove disk from refrigerator. If it is too hard to roll out, let stand in room temperature 10 minutes. On a floured surface, roll out dough into a 12-14-inch circle. Transfer to a parchment-lined rimmed cookie sheet and chill about 15 minutes.
Toss together the fruit, sugar, flour, lemon juice, zest and salt. Remove dough from refrigerator.
Mound fruit filling in the center of the dough, leaving a 2-inch border. Fold border edge up and over fruit mixture in slightly overlapping pleats to form the sides of the tart, but leave the fruit center open 4-5 inches. Remember, it’s rustic, so it doesn’t need to look perfect! Brush dough with a little water, sprinkle with sugar and bake 50-55 minutes or until golden brown.
Cool on rack, slide onto a serving plate, slice and enjoy with vanilla ice cream.
Share with friends!
You might also like:
Zucchini Chile-Cheese Bake
Leaves that were green may be turning to brown, gold and red, but summer’s growing season isn’t over yet. Tall and free, sunflowers still climb upward like Jack’s beanstalk. Their bright yellow blooms sway with afternoon breezes, crossing property lines and surpassing the heights of fences. So full of life and growth, I recently observed…
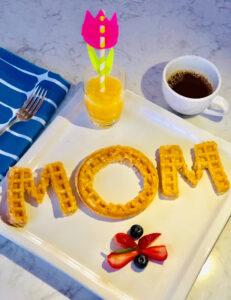
Put Waffles On The Menu For Mother’s Day Breakfast In Bed
Wouldn’t a fluffy, crisp waffle taste good right now?Keep that thought, and now think about Mother’s Day. Mom would no doubt be delighted with breakfast-in-bed waffles smothered with her favorite toppings. Dollops of whipped cream and strawberries on top, or real maple syrup flooding the plate. I could go for that!Here are two ways to…
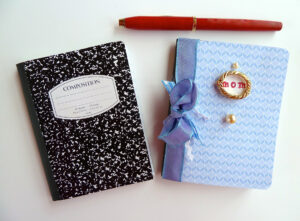
Decorate Mini Notebooks For A Mom’s Day Gift
Think of all the times you need a little notebook: to jot down an inspiring quote, the name of a must-see movie, an appointment and all things in between. But wait; it’s 2021. Isn’t that what memo apps on phones are for? Where reminders and inspirational “aha” moments go up to the Cloud and back…
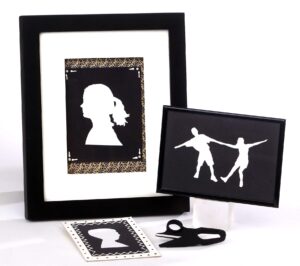
Traditional-Look Silhouettes With Photos
Remember back in your kindergarten days, making large shadow silhouettes on black construction paper for a one-of-a-kind Mother’s Day gift? Next to small handprints pressed into a round of plaster of Paris, silhouettes rank high on the list of personalized gifts Mom expects to receive sometime along the road of motherhood. To keep with tradition,…
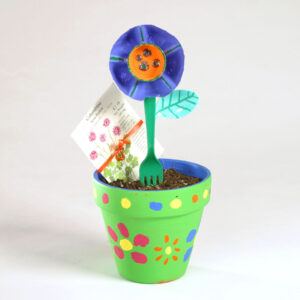
Gardening Kit In A Clay Pot
A first-grade teacher does a project with her class where she gives each student a bag of “mystery seeds” to plant. With no idea what they are, the kids can only guess at the right soil and the best amount of water and sun. Then they watch them sprout and grow.Isn’t being a parent kind…
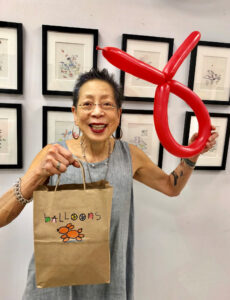
Make and Decorate Easy Bunny Balloons
What is the difference between a bunny and a rabbit? And, just as perplexing, what is a bunny rabbit?To California artist Ivy Chew, whether you call them “bunnies,” “rabbits” or “bunny rabbits, they’re the inspiration for her charming “Rabbit Run” series of archival ink and colored pencil art where her imagination takes us into the…

Decorate Easter Eggs Five Creative Ways
Hop to it! Easter is on its way. Here are some Easter egg-y ideas that are real kid-pleasers. For the first three, all you need are hard-cooked white eggs, prepared decorating dyes in small bowls and a variety of household items.RUBBER-BAND TIE-DYEWind two or three rubber bands of various widths snuggly around egg. Dye the…
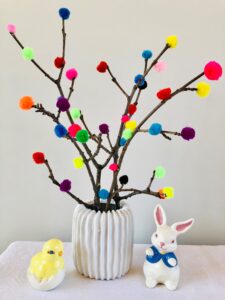
Spring Bouquet With Branches That Sprout Pom-Pom “Blooms”
The first signs of spring are everywhere. Maybe you are noting them on your family calendar with your kids. Crocuses and daffodils poking up through dry leaves and songs of returning birds. Even in places where there aren’t mittens and woolen hats to put away, the first, fresh spring breezes and longer days of sunshine…

Shake and Decorate an “Egg Plant”
Shake and decorate hollowed-out Easter eggs, then save them as keepsakes to display from year to year as a whimsical “egg plant” centerpiece. The lovely eggs, together with other favorites, can be “blooming” out of a pretty Easter basket, a medium-size flowerpot or several mini containers lined down the center of your table or along…
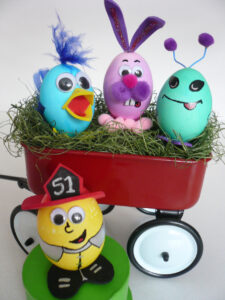
“Character” Egg-Decorating For Families
Which came first – the chicken or the egg? Well, for many families at this time of year, there’s no doubt. Eggs rule! While the kids are busy mixing, dipping and dying Easter eggs, rescue a few from the frenzy and decorate them together to fit each child’s personality, interest or something special you share…
- « Previous
- 1
- 2
- 3
- Next »
DONNA ERICKSON
